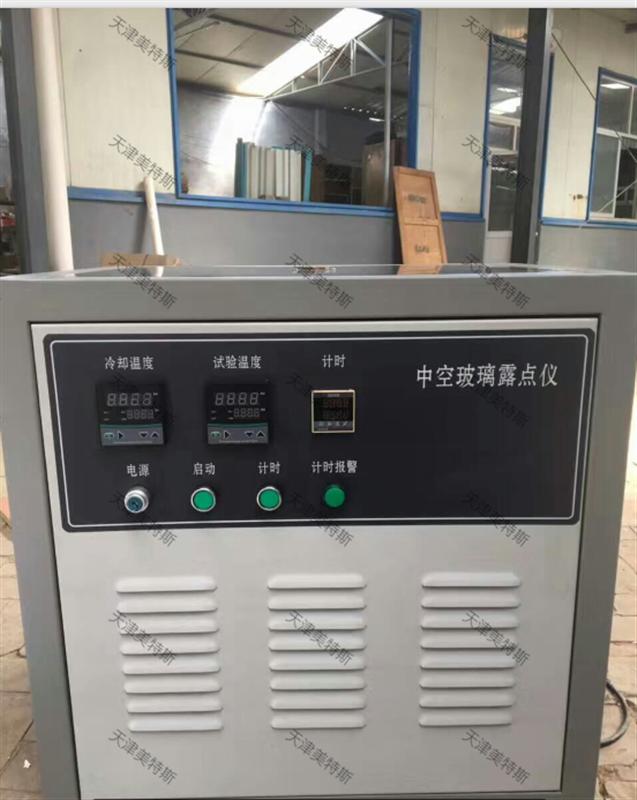
Insulating Glass Dew Point Meter SYL-17 Model Keywords: GB/11944-2002 Hollow Glass Dew Point Measuring Instrument, Manufacturer of Hollow Glass Dew Point Instruments Overview The dew point meter is designed based on the GB/T 11944-2012 "Insulating Glass Standard," using a semiconductor refrigeration system as the main control, with a compressor for auxiliary cooling. It features digital temperature display, easy operation, and clear visual feedback. 1. Power: 500W 2. Power Supply: AC 220V 3. Temperature Measurement Accuracy: ±0.5°C 4. Minimum Operating Temperature: -60°C 1. Plug the power cord into the socket. First press the cooling button to activate the auxiliary cooling for 10 minutes, then turn on the main power switch. 2. Once the system starts, it will automatically adjust the temperature according to the set value (-60°C, -55°C, -50°C, -45°C, -40°C). 3. When the desired temperature is reached, the system will sound an alarm for 10 seconds, then start timing for the test duration. After the time is up, another alarm will indicate the end of the test. The first alarm means the working temperature has been reached, and the second indicates the test is complete. 4. After testing, turn off the main power first, then the auxiliary cooling (note: items 1 and 4 must be strictly followed; do not turn off the auxiliary cooling during the test). ※ This dew point meter includes two cooling systems: one is the semiconductor refrigeration, and the other is the compressor. The main cooling is controlled by the device, while the auxiliary cooling is manually activated via the cooling button. It's essential to pre-cool for 10 minutes before starting. Both cooling systems have separate power switches. Please follow the instructions carefully, as improper use may lead to operational issues or damage. 1. Time Parameter Setting: The left side represents the working time, and the right side is the alarm time. Units are adjustable. 2. Temperature Parameter Setting a. Main Temperature Setting: Press the "SET" key to enter the setting mode. The lower row of the digital display will blink. Use the ">" key to move the cursor and the "∧" and "∨" keys to adjust the temperature. Press "SET" again to save the changes. (The main temperature is set to one decimal place.) b. Alarm Temperature Setting: After pressing "SET" for 3 seconds, the parameter setting mode will appear. Continue pressing "SET" until you reach the "LOAL" item. The alarm temperature is an integer value. Note: Ensure that the LOAL value matches the main temperature setting. Every time the main temperature is changed, the LOAL value should be adjusted accordingly. After-sales Service for Insulating Glass Dew Point Meter: 1. All products come with a one-year warranty. Free service is provided within the warranty period, excluding damage caused by human error or natural disasters. 2. Customers can contact our technical support team for assistance and receive detailed solutions. 3. In case of performance failure during normal use, we guarantee the above warranty. If national laws or regulations differ, we will comply accordingly. 4. Paid maintenance services apply in the following situations during the warranty period: (1) Damage caused by human error or natural disasters (2) Malfunction due to incorrect operation (3) Failure or damage from product disassembly or modification (4) Failure to return the after-sales service commitment form within one month Insulating Glass Dew Point Meter Image: Dash Cam For Honda,Wireless Dual Dash Cam,Dash Cam Front Rear And Inside,Honda Crv Dash Cam SHENZHEN ROSOTO TECHNOLOGY CO., LTD. , https://www.rdtkdashcam.com
I. Insulating Glass Dew Point Meter
II. Technical Specifications
III. Operating Instructions
IV. Parameter Settings